
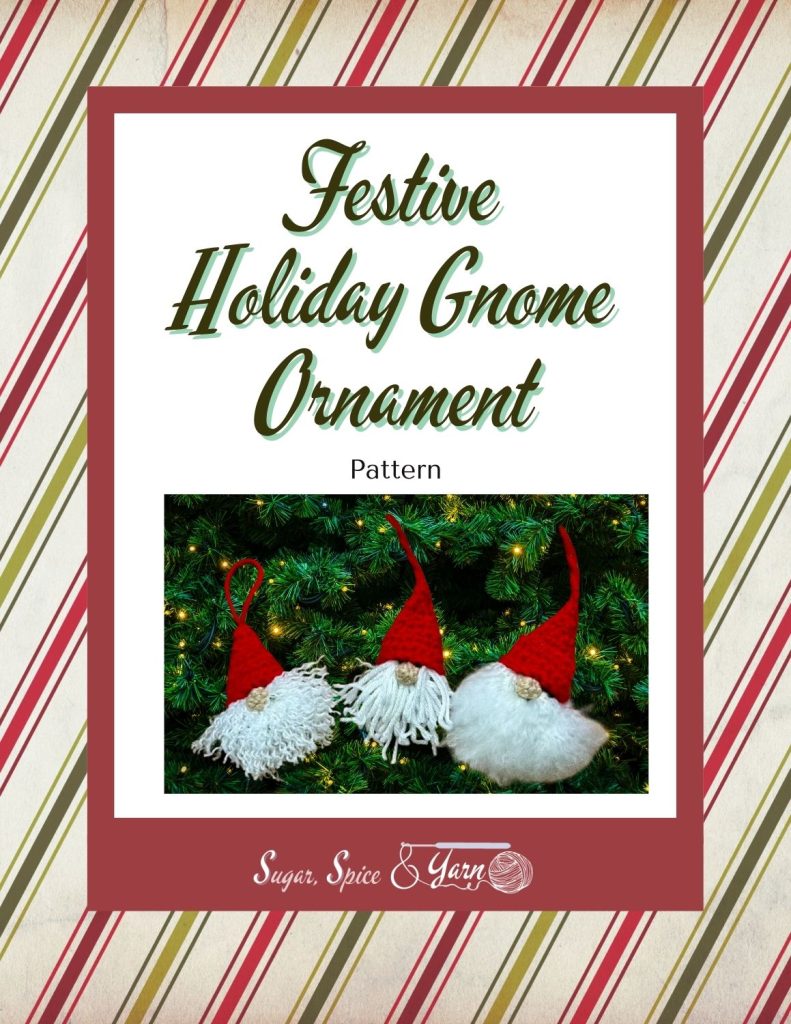
It seems like festive holiday gnomes are popping everywhere lately. And, I have to admit – I love them! My husband gave me my first gnome several years ago for Christmas, and the collection has grown quite a bit over the years. So, I decided it was time to create a crocheted festive holiday gnome ornament for the tree. Why? Well, I didn’t have one. And, why not?!?
To make a Festive Holiday Gnome, you will need:
- Worsted weight (size 4) yarn in 4 colors (I used red, green tan and white) – scraps from your stash work well, the total amount of yarn needed is 10 grams or 1/2 ounce
- Crochet hook – size G/4.25 mm
- Scissors
- Tapestry or yarn Needle
I mainly used yarn from my stash to make these adorable little guys. Which means it was a combination of Red Heart Super Saver yarn and Big Twist Value yarn. Any worsted weight yarn will work to make gnomes that are about 6 inches long and 3 inches wide. This pattern works for any weight of yarn, just adjust your hook accordingly. Use a hook that is at least 1 size smaller than recommended to make sure your stitches stay nice and close together. This even works in a thread weight, but it is very fiddly!

If you prefer a written PDF or video tutorials, you can find both linked at the bottom of the page!
Let’s get Crocheting!
You need to make a few pieces before assembling your Festive Holiday Gnome.
- Body circles (make 2)
- Nose
- Beard (need 26-30 strands)
- Hat triangles (make 2)
Body
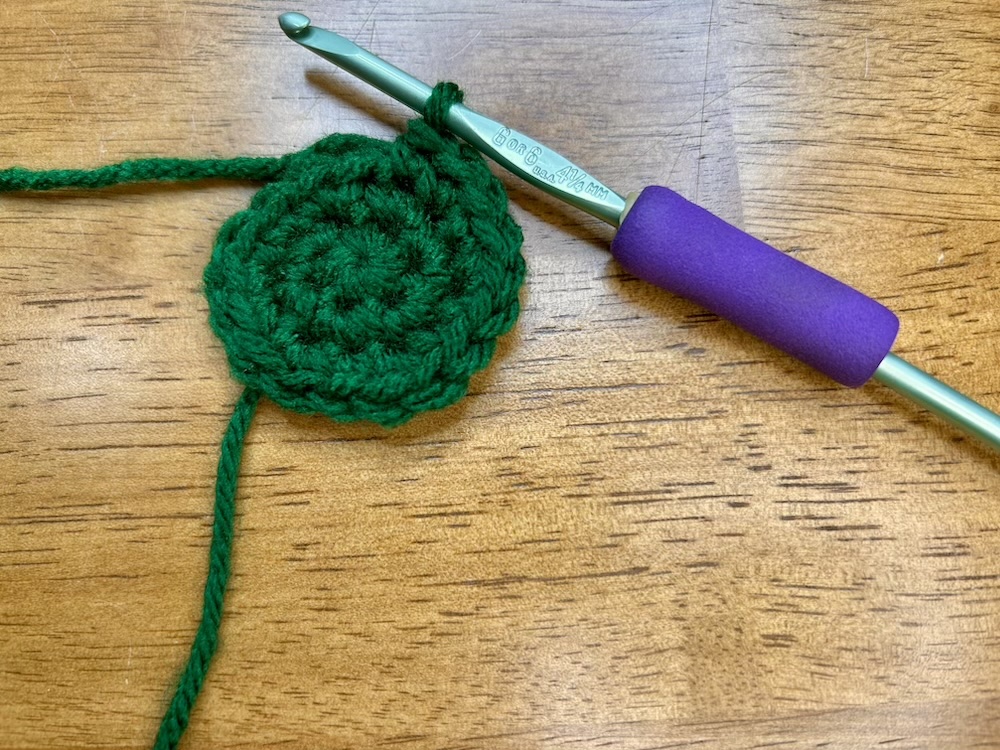
Make 2 circles. Leave a long tail for sewing on one of the circles.
Round 1: Begin with a magic circle, and make 6 single crochets in the circle. If you “just can’t” with the magic circle, chain 2 and work 6 single crochets in the second chain from the hook. Pull your circle tight, but not completely so you can easily find the first stitch.
Do not join the round, we will work in continuous rounds.

Need help with the magic circle? Check out these tutorials:
Round 2: Increase in each stitch around by working 2 single crochets in each stitch. You will have 12 stitches when you finish. Pull your circle completely closed.

Round 3: Work 2 single crochets into the first stitch followed by one single crochet in the next stitch. Repeat this around the circle 5 more times. You will have 18 stitches when finished. Join with a slip stitch to the first stitch and finish off.
Leave a long tail on one of your body circles for sewing them together later. Set the circles aside while you make the nose.

Nose
Round 1: Begin with a magic circle and make 6 single crochet stitches in the circle. (see note above about the magic circle) Pull the circle somewhat tight, but leave it loose enough to easily find the first stitch.
Optional: if you prefer a flat nose on your gnome ornament, stop here. Pull your circle tightly closed, cut the yarn with a long tail for sewing and finish off.

Round 2: Work 1 single crochet in each stitch around. Pull the circle completely tight. Cut the yarn, leaving a long enough tail to sew. Join with a slip stitch to the first stitch and finish off.

Thread the long tail on your needle and work through each stitch to gather the nose into a loose ball.


Now we need to attach the nose to one of the body circles. Find the body without the long tail for sewing.
Thread the magic circle tail on the nose onto your needle. Insert the needle into the center of the body circle and pull completely through. Then, thread the needle onto the long tail of the nose. Use this tail to sew the nose in place on the body. You want the nose to be slightly higher than center of the circle to allow room for the beard. Pull the end through to the back side and tie the nose tails together to secure. Weave in the end from the body circle and trim ends so they fit inside the circle.


Beard
To make the beard, you need to cut 4-inch lengths of yarn. You will need around 26-30 strands, depending on how full you end up making your beard. I found that wrapping the yarn around 3 fingers gave me the right length.

Take 2 strands of yarn and fold them in half. Insert your hook in the body circle to once side of the nose. Pull the loop through part way, then pull the loose ends through the loop to create a slip knot. Pull the ends to tighten the knot and secure the beard strands.


Repeat this process to fill in the beard. You want 2 sets on either side of the nose, about 5 in a row right below the nose and then another row of 3-5 sets. Fill in any gaps as needed with extra sets.


Assemble the Body
Now it’s time to sew the body together! Get your body circle with the long tail and thread the tail onto your needle. Hold the back sides together and whip stitch around the circle. I like to start at the top so that the finishing knot will be under the hat. Tie off and weave in the ends.


Hat
The final piece is his hat! The hat is made with 2 triangles sewn together then attached to the ornament. When making your triangles, leave an extra long tail at the beginning of one for joining the bottom of the hat and sewing it to the head. Also leave a long tail at the end of the same triangle for sewing the triangles together.
Begin by chaining 8 for your foundation chain.
Row 1: Working in the back bumps of the foundation chain, single crochet in the second chain from the hook and in each chain across. You have 7 stitches. Turn.


For help with the back bump, check out these tutorials:
Row 2: Chain 1 and single crochet in each stitch across. You have 7 stitches. Turn.

Row 3: Chain 1. Single crochet the first two stitches together. Single crochet in the next 3 stitches. Single crochet the last two stitches together, leaving you with 5 stitches. Turn.

Row 4: Chain 1 and single crochet in each stitch across. You still have 5 stitches. Turn

Row 5: Chain 1. Single crochet the first two stitches together. Single crochet in the next stitch and single crochet the last two stitches together, leaving you with 3 stitches. Turn.

Row 6: Chain 1 and single crochet in each stitch across. You still have 3 stitches. Turn

Row 7: Chain 1. Single crochet the first two stitches together then single crochet in the last stitch leaving you with 2 stitches. Turn

Row 8: Chain 1 and single crochet in both stitches. Turn

Row 9: Chain 1 and single crochet the two stitches together, leaving you with 1 stitch. Turn

Row 10: Chain 1 and slip stitch into the remaining stitch. Cut yarn and finish off, remembering to leave a long tail on one of the hat triangles for sewing.


Assemble the Hat
The hat is assembled in 2 steps. Before we start, weave in the short ends that you will not use for sewing the hat together. They don’t have to be super neat as they will be on the inside of the hat, but make sure they are on the same side.
For the first step, we will start with the long tail at the top of the hat. Thread this tail onto your needle, then hold the wrong sides of the hats together. Whip stitch down the side of the hat, lining up the bumps at the row ends as you go.


When you reach the bottom corner, carry the yarn through to the other side by working it under the first row of stitches.

Close the other side by whip stitching up to the point. The final stitch should be worked in the point of the hat.


Now, we will add a hanging loop. Insert your needle into the tip of the hat and pull through like you are making a stitch. Use your finger to hold a loop open. Then, insert your needle into the tip of the hat to make a stitch. Pull through completely, holding the loop open with your finger. Finally, Insert the needle to make another stitch, but this time pass the needle through stitch before closing all the way to secure the knot. Give the hanging loop a tug to make sure it is secure, then weave in your ends.

The second step in finishing the hat is working around the bottom edge. Grab your crochet hook and turn the hat upside down. Using the long tail at the base of the hat, insert your hook and pull up a loop, then chain 1. Working in the front loops only, single crochet in each stitch around the base, working a stitch between each side of the hat. This creates a little brim around the base of the hat and helps give the face a little extra definition. You should have 16 stitches around the base of the hat. Join with a slip stitch to the first stitch made and pull the tail through.


It’s finally time to attach the hat to the gnome! Thread the remaining tail onto your needle and pass it through to the inside of the hat. Find the back loops from the brim stitches made. I find it helps to turn up the brim of the hat for this step. Insert the gnome body into the hat, making sure it comes all the way down to the nose. Working through the back loops and into the front of the body (not both sides), stitch the hat to the gnome body. Pull the stitches fairly tight so they are mostly invisible under the brim. Secure with a knot when finished and weave in the ends.


Styling the Beard
The final step is deciding which type of beard your Festive Gnome Ornament will wear. You have three options to choose from:
- Leave the beard as is, keeping the yarn strands fully intact.
- Unravel the yarn strands into their individual parts. For worsted weight yarn, each strand yields 4 smaller strands of yarn. This gives you a wavy, full beard
- Unravel the yarn as in option two, then comb it out using a fine toothed comb. This yields a very fluffy beard that is almost like faux fur.


Voila! You are finished with your Crocheted Festive Holiday Gnome Ornament!
Prefer video tutorials? Find the full tutorials for this pattern here!
Looking for more ornament inspiration? Check out my Christmas Star Ornament pattern!

Buy me some Yarn?
If you are enjoying the content I've created and would like to support with a tip, you've found the right place. Any amount is greatly appreciated!
Send a Tip